| Boomeranger | ||
|---|---|---|
| Statistics | ||
| Class Type | Melee / Ranged | |
| Weapon Type | Melee / Bow | |
| Damage | Physical | |
| Biome | N/A | |
| Acquisition | ||
Adventure Pack | ||
| Class ID | ||
| “ | Boomerangers are skilled with both bow and blade. Bomb your way through bedrock and stun any enemies you find with your trusty boomerang! When things gets too hairy or scary, lob a Mysterious Urn into the fray! | ” |
— In-Game Class Description
|
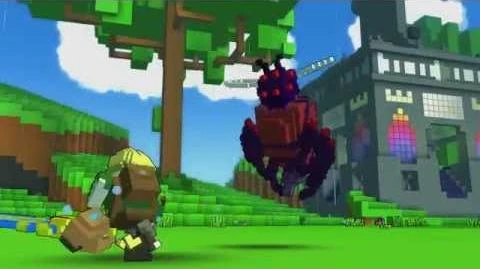
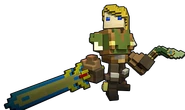
The Boomeranger is a Melee/Ranged fighter from the Prime world of Trove.
Boomerangers are very versatile with the capability of changing from a melee to ranged with just simply changing equipped weapons. They are also equipped with a large range of items including a Boomerang that stuns enemies and reduces cooldown and a large bomb that can break through the toughest Dungeon blocks. They are well noted for their unpredictable Ultimate ability to spawn quick, Healing/Cooldown shards, or even more bombs for damage and/or support.
Unlike most classes, the Boomeranger heavily relies on cooldown rather than energy to use its abilities.
Crafting
| Crafting Station | ||
|---|---|---|
| Ingredient(s) | Amount | |
| Chaos Core | 1 | |
| Flux | 1000 | |
| Primordial Flame | 10 | |
| Golden Soul | 1 | |
| Result | ||
| Boomeranger | 1 | |
Abilities
| Basic Attack WEAPON: Melee DAMAGE: 1.7 x Physical Damage RANGE: 4 Blocks ATTACK RATE: 1.25 x Attack Speed/sec
| ||
|---|---|---|

|
| |
• Can hit multiple enemies • Every third attack will perform a spin attack (much like the Candy Barbarian's Vanilla Swirlwind) and will damage enemies within a 360 radius around the player (4 Block radius) (See below : Finishing Blow) | ||
| Boomerang | ||
| Throw to stun. Catch to reduce all cooldowns. | ||
- Catching it will reduce the cooldown by seven seconds.
- Stuns enemies for 1-1.5 seconds.
- The boomerang bounces away from enemies and other blocks after contact.
- If you're using melee, aim the boomerang straight infront of you on the ground, this will almost instantly return it, reduce the cooldowns and damage/stun any enemies near you.
| Big Bomb | ||
| Throw a timed bomb for a lot of damage and destruction. | ||
- Catching the boomerang will shave off about six or seven seconds.
- throws a large bomb which sticks to a surface, explodes after 2.5-3 secs.
- Can stick on to walls, ceilings, and inside blocks. Will stay suspended in midair if it hits an enemy directly.
- Has a blast radius of 6x6 (no edges) and will only affect blocks above it and to its side.
- WARNING: Destroys blocks very easily.
- Extremely good for mining. If you find an ore vein, try to find the bottom center point --veins of ore are about 5x5x5 in size--, if you throw the bomb there then you should clear out the entire vein with just that one bomb.
| Bawk-Bomb DAMAGE: 5 x Physical Damage RANGE: N/A COOLDOWN: 20 Seconds
| ||
|---|---|---|

|
| |
• Spawns up to 3 chickens per bomb (deals 2-3 x PD per chicken). • Chickens can stay on the field for 8 seconds until they despawn. • Catching the boomerang will shave off about six or seven seconds. • throws a large bomb which sticks to a surface, explodes after 2.5-3 secs. • Can stick on to walls, ceilings, and inside blocks. Will stay suspended in midair if it hits an enemy directly. • Has a blast radius of 6x6 (no edges) and will only affect blocks above it and to its side. • WARNING: Destroys blocks very easily. • Extremely good for mining. If you find an ore vein, try to find the bottom center point --veins of ore are about 5x5x5 in size--, if you throw the bomb there then you should clear out the entire vein with just that one bomb. | ||
| Mysterious Urn | ||
| Throw a mysterious urn for area damage and a random bonus. | ||
- Catching the boomerang will shave off about seven seconds.
- 100% dealing AOE damage 6x6(?) and one additional effect randomly chosen from the following:
- 25% chance to drop Cluster Bombs around the impact of the urn. Bombs have an AoE damage of 2 blocks from the source (deals 4 x PD).
- 25% chance to drop Healing Gems. Heals the user immediately and all other players in the area (8 gems; similar to that of Candy Barbarian's Ultimate: Eis-Crom Cone).
- 25% chance to drop Cooldown Gems. Cooldown Gems gives a reduced cooldown to all players within the area (8 gems).
- 25% chance to summon three Quchik allies (chicken allies) to fight for the player. Quchiks cannot be harmed (deals 2 x PD per chicken).
| Finishing Blow | ||
| Every third attack does extra damage. | ||
- For melee users, players can do a spin attack after every third attack.
- 360 degree hitbox (capable of hitting enemies behind you)
- Provides decent knockback
- For bow users, players can shoot three shots after every third attack.
- Arrows that aren't used can continue after the enemy was previously defeated.
Stat gain per level
Note: Boomeranger gets +10% Physical Damage, +30% Health Regeneration and +30% Maximum Health boost at the start without any gear/gems.
| Level | Physical Damage | Maximum Health | Health Regeneration | Stability | Attack Speed | Movement Speed |
|---|---|---|---|---|---|---|
| 2 | +10 | +20 | +10 | +1 | - | - |
| 3 | +10 | +20 | +10 | +1 | - | - |
| 4 | +18 | +40 | +20 | +1 | - | - |
| 5 | +18 | +40 | +20 | +1 | - | - |
| 6 | +35 | +60 | +30 | +1 | - | - |
| 7 | +35 | +60 | +30 | +1 | - | - |
| 8 | +50 | +80 | +40 | +1 | - | - |
| 9 | +50 | +80 | +40 | +1 | - | - |
| 10 | +50 | +100 | +50 | +1 | - | - |
| 11 | +50 | +100 | +50 | +1 | - | - |
| 12 | +50 | +100 | +50 | +1 | - | - |
| 13 | +50 | +100 | +50 | +1 | - | - |
| 14 | +50 | +100 | +50 | +1 | - | - |
| 15 | +50 | +100 | +50 | +1 | - | - |
| 16 | +50 | +100 | +50 | +1 | - | - |
| 17 | +50 | +100 | +50 | +1 | - | - |
| 18 | +50 | +100 | +50 | +1 | - | - |
| 19 | +50 | +100 | +50 | +1 | - | - |
| 20 | +50 | +300 | +150 | +2 | +10 | +3 |
| 21 | +100 | +200 | +100 | +2 | - | - |
| 22 | +100 | +200 | +100 | +2 | - | - |
| 23 | +100 | +200 | +100 | +2 | - | - |
| 24 | +100 | +200 | +100 | +2 | - | - |
| 25 | +150 | +300 | +150 | +3 | - | - |
| 26 | +150 | +300 | +150 | +3 | - | - |
| 27 | +150 | +300 | +150 | +3 | - | - |
| 28 | +150 | +300 | +150 | +3 | - | - |
| 29 | +200 | +400 | +200 | +4 | - | - |
| 30 | +250 | +500 | +250 | +5 | - | - |
Gameplay Strategy
Tactics
Due to the Boomeranger's passive, Finishing Blow, it is recommended for players to obtain gear that has lots of Physical Damage and Attack Speed to get maximum damage output. Players can use this class two different ways, a bulky melee fighter (due to masive AoE damage) or a supportive bow user.
Teamplay
- The Boomeranger easily synergies well with Ice Sage. Her slow allows you to hit more boomerangs so you can kite them and let you catch your boomerangs. The Mysterious urn can be extremely useful to help support allies.
- Boomerangers can be the tank or the Damage dealer, they're very flexible.
General Tips
- Catch your Boomerang to reduce your cooldowns so you can do more damage faster.
- Try to wear gear that gives attack speed, to maximize your damage from your passive.
- Your ultimate is luck based. It can do something really random and can mess you up in situations.
- Using allies like Rapt Berserker will help increase the damage output while Prowling Shadow or Samantha can help with survivability.
- When using a Melee weapon, keep yourself in the middle of the fight. Don't split up just to take down the ranged enemies in the back line.
Flasks and Emblems
There are a few really interesting emblem combinations you can use, but it is recommended to use the Bandolier for a flask since the emblems will provide more of a use when fighting enemies.
- Martial+Shadow Shrike: If you have this, you'll be really ultimate reliant. Whenever you get chickens from your urn, use it, the martial will give double damage for your shadow shrike minion and your chickens, and the shadow shrike minion is just an extra minion to add to the chicken army.
- Chronomatic: Useful for cooldown reduction, you can combine this with a lot of other emblems like unyielding, shadow shrike or martial.
- Restorative: Recommended if you have a LOT of health regen from items, since it doubles your health regen for 10 seconds. VERY useful in combination with bandolier since bandolier has less heal but more charges, but the health regen boost effectively cancels out the reduced health gain from the flask.
- Berserker+Vampiric: Recommend this if you're using a sword, if you have enough health you can switch out the Vampiric for martial for insane damage.
- Martial and Surestrike: This does the most damage, it is used the most.
Allies
There are several Allies that can be used to benefit the Boomerangs, some of which can help survivability and/or increase overall damage.
- Rapt Berserker: Useful for getting the maximum damage output of the class to deal damage in large groups of enemies. The additional Movement Speed and the Health Regeneration are also beneficial, especially for Bow users.
- Prowling Shadow: With the maximum Attack Speed, this is extremely effective in staying alive. This is recommended for Melee users because of the range of the Boomerangers basic attack (Including the Passive). In combination with the Vamparic Emblem, every hit will give 4.4% health back.
- Samantha: An alternative to the Prowling Shadow but with Jumps and Superstition instead of Movement Speed.
- Elder Dragonling: An all around useful ally however more difficult to obtain than most allies. This ally gives all necessary stat boosts like Damage, Cooldown, and the additional ability to Ignite enemies when damaged for additional damage to groups of enemies.
- Monarch Dragonling: Has the same effect as Elder Dragonling but obtained through Mastery.
- Bitty Shadow Bro: Similar to the Dragonling but with a few differences. The damage remains the same until its ability kicks in. It has a special ability to increase Movement Speed, Attack Speed, and Damage drastically but with the chance of 25% of the ability setting off when defeating an enemy. Recommended for player doing damage to large groups of enemies to increase the chance to activate the ability.
- Shield Servitor: A nice defensive ally that increases survivability, even on higher difficulty. Although the Prowling Shadow/Samantha ally is more useful for surviving enemies, this ally can still be useful if the player does not have either ally.
- Chronomancer Qubesly: Not recommended for damage but helps in decreasing cooldowns for mining purposes. Use if you don't have the Lil Burgie.
- Lil Burgie: Use this if you have it. Equivelant to Chronomancer Qubesly, but physical damage instead of magic. Only available sometimes though.
Skill Usage
- Spam your boomerang as much as you can and catch it whenever you can.
- Don't always rely on the ultimate to replenish your cooldowns and/or health, the ability is completely random and can harm the player if used in that way.
- Big Bomb does lots of damage, but it takes a long time for it to explode. Drop it early in the fight and then bait the enemies to maximize your chances of landing it.
- Big Bomb has the ability to destroy traps such as Fireball and Flamethrowers. Plant them near those traps to destroy them.
- Big Bomb specializes in destroying weak monsters, some examples include boss buffs and trash mobs.
Beware of
- Teleporting monsters can make you miss all your skills since all of them are not targetable (excluding Quichiks). Fire your skills after he teleports to land lots of skills.
- Bosses with Thorns can greatly harm when taking advantage of the Boomeranger's Passive, dealing lots of hits while the bosses' ability is active can cause extreme damage.
- Bosses with the Frost Buff can hinder the Boomeranger's Attack Speed and loose advantage of the Passive.
Costumes
| Boomeranger (11) |
|---|
| Item | Description | Obtained |
|---|---|---|
0 Mastery points |
N/A | • Granted to all players. |
35 Mastery points |
N/A | • Granted to all players after reaching EXP lv. 10 as Boomeranger. |
35 Mastery points |
N/A | • Granted to all players after reaching EXP lv. 20 as Boomeranger. |
70 Mastery points |
A costume for the Boomeranger. Stalk your enemies in stealth with this with these black pajamas. | • Bought from the store for • Adventure Pack |
70 Mastery points |
A costume for the Boomeranger. With this sleek snow camouflage print you are right at home in the Permafrost. | • Bought from the store for • Adventure Pack |
70 Mastery points |
A costume for the Boomeranger. Be the hero you were born to be! | • Bought from the store for • Shadow's Eve Costume Pack |
70 Mastery points |
A costume for the Boomeranger. Sleight of hand, across the land. | • Bought from the store for • Shadow's Eve Costume Pack |
70 Mastery points |
Craftable costume for the Boomeranger. Builds things or blows them up as the situation requires. | • Craftable at the Chaos Core Crafter. |
175 Mastery points |
A rare lunar Boomeranger Costume. Perfect for powerhouses packed with surprises. | Bought from the Shadowy Market |
35 Mastery points |
A costume for the Boomeranger. Show off your superior hunting skills with this armor wrought from felled fiends. | • Craftable at the Chaos Core Crafter. |
35 Mastery points |
A costume for the Boomeranger. Death is a common occupational hazard among adventurers, but sometimes you just have to roll with the punches and keep going. | • Craftable at the Chaos Core Crafter. |
Video
Gallery
Trivia
- Originally, the class was named the Adventurer until the Monster Bash Preview, where it was changed to Boomeranger.
- When this class was first introduced in a Friday stream, the development team gave the name Tink to this class. The name is a mix between "Trove" and "Link." The design and unique abilities is all a reference to Link from The Legend of Zelda series.
- The Boomerangers' dance reference is the "Dancing Bug" from Adventure Time.
- Players believe that the Boomeranger is not affiliated with any sort of Biome theme because of how it is mainly an "adventurer" that roams the world of Trove and have various abilities that suit various landscapes.
- There is currently a glitch with him when if you have no equipment with Boomeranger and you switch from Candy Barbarian to Boomeranger, he will have dual wielding swords, although they do not attack.
- In The Class Preview Video when the Boomeranger says "Its almost like a Link To The Past" its a reference to the Super Nintendo Entertainment System Game The Legend of Zelda A Link to the Past
History
- [19 May, 2015] Monster Bash Update: Class Introduced
| Classes | ||||||
|---|---|---|---|---|---|---|
 Knight |
 Gunslinger |
 Fae Trickster |
 Dracolyte |
 Neon Ninja | ||
 Candy Barbarian |
 Ice Sage |
 Shadow Hunter |
 Pirate Captain |
 Boomeranger | ||
 Tomb Raiser |
 Lunar Lancer |
 Revenant |
 Chloromancer |
 Dino Tamer | ||
 Vanguardian |
 Bard |
 Solarion |
||||

