| Darknik Dreadnought Mk II | |||
|---|---|---|---|
| Statistics | |||
| Category | Boss | ||
| Type | Dreadnought | ||
| Biome | Shadow Tower | ||
| Floor 5 Room 4 | |||
| AI Type | Darknik Dreadnought Mk II | ||
| Max Life | Normal: 422.55M Hard: 1.74B Ultra: 915.52M | ||
| Item Drops | |||
| Item (Quantity) | Rarity | ||
| File:Darknik Dreadnought Mk II Wall Trophy.pngDarknik Dreadnought Mk II Wall Trophy | Rare | ||
 De-Weaponized Worldender Cache De-Weaponized Worldender Cache
|
Rare | ||
 Dreadnought Mk I Prototype Cache Dreadnought Mk I Prototype Cache
|
Very Rare | ||
| Weekly Item Drops | |||
| 1 | |||
| 3 | |||
| 5 | |||
| NPC ID | |||


The Darknik Dreadnought Mk II (or Darknik Dreadnought) is a Shadow Titan which appears on the fourth room of the fifth floor in the Shadow Tower. Once a week, defeating it and opening the Shadow Tower Vault it leaves behind will give 1, 3 or 5 Titan Souls depending on the difficulty it was killed.
Like all Titans, it is immune to being frozen, stunned, or knocked back.
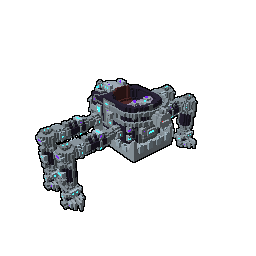
Appearance[]
The Dreadnought has a somewhat simple appearance, being primarily a large enclosed body, rounded at the front and back but flat on the sides, top and bottom. It has a light blue cockpit on the upper front, while the bottom appears similar to the Dream Monster's head.
It has a metallic hatch similar in appearance to the Dream Monster's jaw from which various blades come out throughout the fight. Behind the Dream Monster hatch, it has a second hatch which houses an autocannon, and above it has another compartment housing a shotgun. It has two small missile launchers that can come out from its sides, and near the top a circular "eye" moves along fixed rails around the front of the boss, much like a Punchbot, which has a cover over it for protection.
The Dreadnought's structure is similar to the Spike Walker, being quadruped with 2 pairs of legs on the sides. It appears to be more thickly armored and better covered than the Spike Walker, however.
Behavior[]
The Darknik Dreadnought Mk II has a mix of melee and ranged attacks, using a variety of guns and bombs throughout the fight.
It has 5 phases, changing every 20% health lost and gaining and losing various abilities in each phase. Starting in the third phase, increasing amounts of blue sparks will appear in various locations on the boss as it switches phases, and it begins to move and attack faster.
Phase One[]
The initial phase when the fight begins, with mostly predictable and avoidable melee abilities.
- Physical Shield: Cycles randomly at predictable intervals alongside the Magic Shield. Appears as several yellow arrows cycling around the boss; while active, physical attacks cannot harm it (but still trigger on-hit abilities and passives). It can still attack as normal while a shield is active.
- Magic Shield: Cycles randomly at predictable intervals alongside the Physical Shield. Appears as a purple dome surrounding the boss; while active, magic attacks cannot harm it (but still trigger on-hit abilities and passives). It can still attack as normal while a shield is active.
- Shoot: Shoots a single ranged projectile towards the targeted player. Used when no other offensive abilities are active.
- Autocannon: Leans backwards, allowing an autocannon to appear from the hatch on the boss's back underside, which then shoots directly forwards in a small cone for several seconds dealing damage to anything in front.
- Stomp: Stomps in front of the boss, dealing moderate damage and knockback in a small area.
- Cleave: Cleaves a blade forward from the hatch beneath the boss, dealing damage and knockback at melee range.
Phase Two[]
The boss's second phase begins when it reaches 80% health. Its special abilities are swapped out entirely.
- Physical Shield: Cycles randomly at predictable intervals alongside the Magic Shield. Appears as several yellow arrows cycling around the boss; while active, physical attacks cannot harm it (but still trigger on-hit abilities and passives). It can still attack as normal while a shield is active.
- Magic Shield: Cycles randomly at predictable intervals alongside the Physical Shield. Appears as a purple dome surrounding the boss; while active, magic attacks cannot harm it (but still trigger on-hit abilities and passives). It can still attack as normal while a shield is active.
- Shoot: Shoots a single ranged projectile towards the targeted player. Used when no other offensive abilities are active.
- Salvo: Missile launchers appear from the sides of the boss, which shoot a salvo of black and blue bombs into the air, which spread patches of flame where they land as environmental hazards. They can hit walls as well as the floor.
- Jump: Jumps into the air towards the center of the arena, dealing heavy damage and knockback in an area on contact.
- Blast: The boss drops to the floor and a shotgun appears from above the hatch on the underside of the boss, shooting forwards once in a cone dealing high damage and knockback.
- Skewer: Stabs forward a large spear from the hatch beneath the boss, dealing damage at melee range.
Phase Three[]
At 60% health the boss combines its bomb salvo and shotgun blast into a single Incinerate skill.
It also begins to spark visibly, and move and attack faster.
- Physical Shield: Cycles randomly at predictable intervals alongside the Magic Shield. Appears as several yellow arrows cycling around the boss; while active, physical attacks cannot harm it (but still trigger on-hit abilities and passives). It can still attack as normal while a shield is active.
- Magic Shield: Cycles randomly at predictable intervals alongside the Physical Shield. Appears as a purple dome surrounding the boss; while active, magic attacks cannot harm it (but still trigger on-hit abilities and passives). It can still attack as normal while a shield is active.
- Shoot: Shoots a single ranged projectile towards the targeted player. Used when no other offensive abilities are active.
- Jump: Jumps into the air towards the center of the arena, dealing heavy damage and knockback in an area on contact.
- Incinerate: The boss's eye centralizes and is uncovered, then shoots flame forwards in a wide cone, dealing high damage and creating an arc of flame patches on the ground at the edge of its radius.
- Skewer: Stabs forward a large spear from the hatch beneath the boss, dealing damage at melee range.
Phase Four[]
At 40% health, the boss retains all its skills from the previous phase, but gets a World-Ender nuke ability, which can instantly kill the players if they aren't careful.
More sparks are visible, and the boss moves and attacks slightly faster than before.
- Physical Shield: Cycles randomly at predictable intervals alongside the Magic Shield. Appears as several yellow arrows cycling around the boss; while active, physical attacks cannot harm it (but still trigger on-hit abilities and passives). It can still attack as normal while a shield is active.
- Magic Shield: Cycles randomly at predictable intervals alongside the Physical Shield. Appears as a purple dome surrounding the boss; while active, magic attacks cannot harm it (but still trigger on-hit abilities and passives). It can still attack as normal while a shield is active.
- Shoot: Shoots a single ranged projectile towards the targeted player. Used when no other offensive abilities are active.
- Jump: Jumps into the air towards the center of the arena, dealing heavy damage and knockback in an area on contact.
- Incinerate: The boss's eye centralizes and is uncovered, then shoots flame forwards in a wide cone, dealing high damage and creating an arc of flame patches on the ground at the edge of its radius.
- Skewer: Stabs forward a large spear from the hatch beneath the boss, dealing damage at melee range.
- World Ender: Turns the room primarily red except for the corners of the room, then launches a large 'World Ender' bomb into the air and sprays flame patches around itself. If a player is on or above a red area when the bomb lands, they will be killed instantly; this ignores on-death abilities.
Phase Five[]
At 20% health, the boss's skills are again mostly the same, but it regains the abilities it lost in the third phase.
The boss also begins to show many rapid blue sparks throughout its body and begins to move and attack significantly faster.
- Physical Shield: Cycles randomly at predictable intervals alongside the Magic Shield. Appears as several yellow arrows cycling around the boss; while active, physical attacks cannot harm it (but still trigger on-hit abilities and passives). It can still attack as normal while a shield is active.
- Magic Shield: Cycles randomly at predictable intervals alongside the Physical Shield. Appears as a purple dome surrounding the boss; while active, magic attacks cannot harm it (but still trigger on-hit abilities and passives). It can still attack as normal while a shield is active.
- Shoot: Shoots a single ranged projectile towards the targeted player. Used when no other offensive abilities are active.
- Jump: Jumps into the air towards the center of the arena, dealing heavy damage and knockback in an area on contact.
- Salvo: Missile launchers appear from the sides of the boss, which shoot a salvo of black and blue bombs into the air, which spread patches of flame where they land as environmental hazards. They can hit walls as well as the floor.
- Incinerate: The boss's eye centralizes and is uncovered, then shoots flame forwards in a wide cone, dealing high damage and creating an arc of flame patches on the ground at the edge of its radius.
- Blast: The boss drops to the floor and a shotgun appears from above the hatch on the underside of the boss, shooting forwards once in a cone dealing high damage and knockback.
- Skewer: Stabs forward a large spear from the hatch beneath the boss, dealing damage at melee range.
- World Ender: Turns the room primarily red except for the corners of the room, then launches a large 'World Ender' bomb into the air and sprays flame patches around itself. If a player is on or above a red area when the bomb lands, they will be killed instantly; this ignores on-death abilities.
Strategy[]
- Due to the boss's shields, timing abilities well is vital or an ultimate skill could be wasted.
- The Dreadnought's standard projectile shots can deal high damage and quickly kill any players who get hit; having a high-health tank able to hold the boss's attention and survive the hits is necessary to keep the other players alive.
- First phase (100% health):
- In its first phase, the Dreadnought's skills are mostly predictable close-range attacks. Dodging or stepping to the side can avoid them easily, as long as the players know what their preparations look like.
- Ranged fighters face little to no threat and can attack without restriction, as long as a melee player holds the boss's attention.
- Second phase (80% health):
- The second phase is more evenly spread, being able to effectively target all players.
- Melee fighters primarily have to stay away from the center of the arena when the boss leaps to avoid being caught in the impact. Side-stepping the shotgun blast is also important.
- Ranged fighters need to watch the bomb salvo the boss launches, as being hit can kill them quickly. Avoiding the flames they leave is important, but generally simple.
- Third phase (60% health):
- The third phase is similar to the second phase, the main difference being that its shotgun blast and bomb salvo were merged into a single attack.
- This phase is generally easier to handle than the last, as the incineration beam leaves less fire than the bomb salvo and is much more predictable and easier to avoid. Ranged classes again will not be targeted as the incineration beam is focused on close-range and bombs can no longer be used.
- Fourth phase (40% health):
- The Dreadnought's World Ender ability makes the fight far more difficult than the previous stages, making otherwise negligible skills potentially deadly when combined with the bomb.
- The tank has to make sure a corner is readily accessible to all melee classes, but cannot allow the boss itself to face the corner or its incineration beam may make it deadly and cause all melee players to be wiped immediately.
- Ranged classes should stay within any corner at all times to negate any risk of being killed by the bomb.
- If the boss itself is led into a corner just before or after launching a World Ender, fighting it may become more difficult as there is less room to dodge its attacks.
- Fifth phase (20% health):
- The fifth phase is by far the most challenging, as its bomb salvo may make safe zones inaccessible even when the Dreadnought is kept away.
- Staying near corners is vital as the bomb leaves less time to dodge before hitting.
- Both melee and ranged classes have to watch the corners they're hiding in (or planning to), as bombs may target them without the players noticing; if they do, relocate accordingly.
- Melee classes may also have difficulties dodging the skills the boss gained in phase 3, as flames may block them from sidestepping.
Notes[]
In the official lore, this boss was created by a Shadow named Dr. Darknik, as evidenced by the name of the boss. He can also be seen piloting it in the boss's cockpit in-game.
Dr. Darknik also created various other mechanical monsters in the game, such as the Spike Walker boss, Darknik Warbot enemy, and Flamotron Mk II
Gallery[]
")